검색결과 리스트
글
WebAssembly C++ Class Binding
C++ 작성한 클래스를 사용해보자~!
1. 코드작성
|
1
2
3
4
5
6
7
8
9
10
11
12
13
14
15
16
17
18
19
20
21
22
23
|
//bind_test.h
#ifndef __BIND_TEST_H__
#define __BIND_TEST_H__
class BindTest
{
public:
BindTest();
BindTest(int number);
virtual ~BindTest();
private:
int mNumber;
int mPropertyNumber;
public:
void Increase();
int GetNumber();
void SetPropertyNumber(int pNumber){ mPropertyNumber = pNumber; }
int GetPropertyNumber() const { return mPropertyNumber; }
};
#endif
|
cs |
|
1
2
3
4
5
6
7
8
9
10
11
12
13
14
15
16
17
18
19
20
21
22
23
24
25
26
27
28
29
30
31
32
33
34
35
36
37
38
39
40
41
42
43
44
|
//bind_test.cpp
#include <iostream>
#include <emscripten/bind.h>
#include "bind_test.h"
using namespace emscripten;
BindTest::BindTest()
{
mNumber = 0;
mPropertyNumber = 0;
}
BindTest::BindTest(int number)
: mNumber(number)
{
}
BindTest::~BindTest()
{
}
void BindTest::Increase()
{
mNumber++;
}
int BindTest::GetNumber()
{
return mNumber;
}
EMSCRIPTEN_BINDINGS(b_bind_test)
{
class_<BindTest>("BindTest")
.constructor<>()
.constructor<int>()
.function("Increase", &BindTest::Increase)
.function("GetNumber", &BindTest::GetNumber)
.property("mProperyNumber", &BindTest::GetPropertyNumber, &BindTest::SetPropertyNumber)
;
}
|
cs |
getter 상용할 때, const 명시할 것.
int GetPropertyNumber() const { return mPropertyNumber; }
2. 컴파일
|
1
2
|
emcc bind_test.cpp -o bind_test.js -s WASM=1 --bind
|
cs |
기존 예제와는 다르게 뒤에 --bind 추가
3. index.html 작성
|
1
2
3
4
5
6
7
8
9
10
11
12
13
14
15
16
17
18
19
20
21
22
23
24
25
26
27
28
29
30
31
32
33
34
35
|
<!DOCTYPE html>
<html>
<head>
<meta charset="EUC-KR">
<title>Wasm Test Page</title>
</head>
<body>
<button id="btn" onclick="OnClickBtn();">click here!</button>
<script>
function OnClickBtn()
{
var bind = new Module.BindTest();
console.log('[bind_test] get number = ' + bind.GetNumber());
bind.Increase();
console.log('[bind_test] get number = ' + bind.GetNumber());
bind.Increase();
bind.Increase();
console.log('[bind_test] get number = ' + bind.GetNumber());
console.log('[bind_test] direct value of mNumber = ' + bind.mNumber);
bind.mPropertyNumber = 0;
console.log('[bind_test] mPropertyNumber = ' + bind.mPropertyNumber);
bind.mPropertyNumber = 5;
console.log('[bind_test] mPropertyNumber = ' + bind.mPropertyNumber);
bind.mPropertyNumber = 7;
console.log('[bind_test] mPropertyNumber = ' + bind.mPropertyNumber);
var bind2 = new Module.BindTest(99);
console.log('[bind_test] get number = ' + bind2.GetNumber());
}
</script>
<script type='text/javascript' src='./js/bind_test.js'></script>
</body>
</html>
|
cs |
4. 결과확인

'개발 이야기 > WEB' 카테고리의 다른 글
| WebAssembly + C struct(구조체) (0) | 2020.05.15 |
|---|---|
| Eclipse Web Project + WebAssembly Sample (0) | 2020.05.12 |
설정
트랙백
댓글
글
WebAssembly + C struct(구조체)
구조체를 가져와서 출력해보는 예제.
1. 소스 코드 작성
|
1
2
3
4
5
6
7
8
9
10
11
12
13
14
15
16
17
18
19
20
21
22
23
|
//struct_test.c
#include <stdio.h>
#include <emscripten/emscripten.h>
#include <stdlib.h>
typedef struct st_study
{
int value_1;
int value_2;
} study;
EMSCRIPTEN_KEEPALIVE
study* init_struct(int value_1st, int value_2nd)
{
study* stStudy = (study*)malloc(sizeof(study));
stStudy->value_1 = value_1st;
stStudy->value_2 = value_2nd;
return stStudy;
}
|
cs |
2. 컴파일
|
1
|
emcc struct_test.c -o struct_test.js -s WASM=1 -s EXTRA_EXPORTED_RUNTIME_METHODS=['ccall','cwrap','getValue']
|
cs |
3. index.html 작성
|
1
2
3
4
5
6
7
8
9
10
11
12
13
14
15
16
17
18
19
20
21
22
23
24
25
26
|
<!DOCTYPE html>
<html>
<head>
<meta charset="EUC-KR">
<title>Wasm Test Page</title>
</head>
<body>
<button id="btn" onclick="OnClickBtn();">click here!</button>
<script>
function OnClickBtn()
{
const study = Module.ccall('init_struct',
'number',
['number', 'number'],
[5, 10]);
var value_1 = Module.getValue(study, 'i32');
var value_2 = Module.getValue(study + 4, 'i32');
console.log('[study] value_1 = ' + value_1 + ' value_2 = ' + value_2);
}
</script>
<script type='text/javascript' src='./js/struct_test.js'></script>
</body>
</html>
|
cs |
- return type : 'number' 는 pointer 도 포함.
- getValue(ptr, type [, noSafe])
ptr -> study 구조체 변수는 4바이트 2개. 처음 value_1 가 4바이트형 자료형이기 때문에 + 4.
type -> 'i32' 4바이트 변수 자료형
4. 결과 확인

웹어셈 관련 글을 작성하고 있지만, 이게 100%는 아니다.
그냥 참고만 하시길...
'개발 이야기 > WEB' 카테고리의 다른 글
| WebAssembly C++ Class Binding (0) | 2020.05.18 |
|---|---|
| Eclipse Web Project + WebAssembly Sample (0) | 2020.05.12 |
설정
트랙백
댓글
글
WebAssembly multiple module
WebAssembly 아직은 너무 생소하다...
emcc 커맨드를 통해 컴파일한 결과물... 예를 들면,
aaa.js bbb.js ccc.js
이 녀석들을 열어보면...
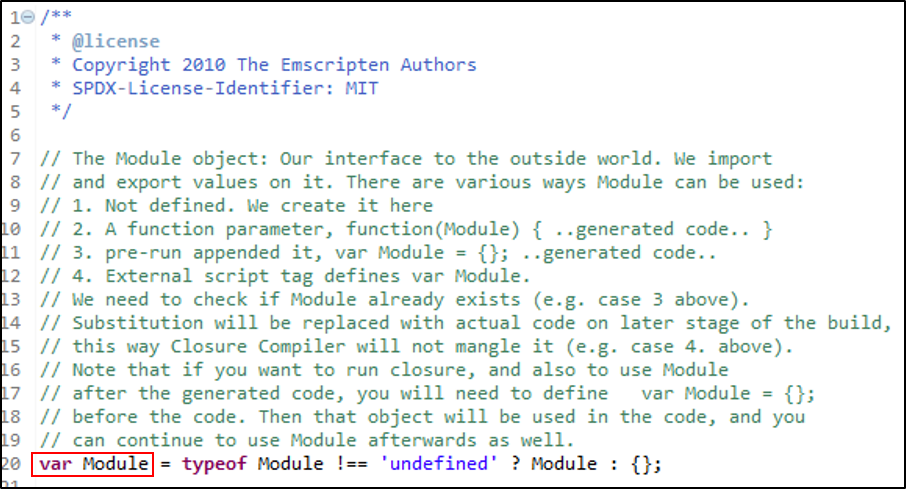
그럼... 내가 여러개의 웹어셈블 코드를 사용한다 치자...
전부 다 Module 이네? 어떤걸로 구분하지...?
실제로 아직 웹어셈블을 이용하여 개발을 해본적은 없기에 이 방법이 맞는지는 모르겠다.
1. compile
|
1
2
3
4
5
6
7
8
|
//example [aaa]
emcc aaa.c -o aaa.js -s WASM=1 -s EXTRA_EXPORTED_RUNTIME_METHODS=['ccall','cwrap'] -s EXPORT_NAME="'custom_1'" -s MODULARIZE=1
//example [bbb]
emcc bbb.c -o bbb.js -s WASM=1 -s EXTRA_EXPORTED_RUNTIME_METHODS=['ccall','cwrap'] -s EXPORT_NAME="'custom_2'" -s MODULARIZE=1
//example [ccc]
emcc ccc.c -o ccc.js -s WASM=1 -s EXTRA_EXPORTED_RUNTIME_METHODS=['ccall','cwrap'] -s EXPORT_NAME="'custom_3'" -s MODULARIZE=1
|
cs |
2. javascript sample code
|
1
2
3
4
5
6
7
8
9
10
11
|
custom_1().then(function(Module){
Module.ccall(...............);
});
custom_2().then(function(Module){
Module.ccall(...............);
});
custom_3().then(function(Module){
Module.ccall(...............);
});
|
cs |
EXPORT_NAME 으로 지정한 custom_1, custom_2, custom_3 으로 호출했다.
솔직히 이게 맞는 방법인진 모르겠다..............
